
Get Your Website Indexed Faster & Boost Visibility
If you’ve ever wondered why your website isn’t showing up in Google search results, the answer might be simple: Google hasn’t indexed it yet.
Search engines need to crawl your site before they can display it in search results, and one of the best ways to speed up this process is by submitting your sitemap to Google.
In this post, I’ll walk you through the step-by-step process of submitting your sitemap using Google Search Console so your content can be found faster. Let’s dive in!
What is a Sitemap?
A sitemap is a file that lists all the important pages on your website, helping search engines like Google understand its structure. Think of it as a roadmap that tells Google where to find your content.
When you submit a sitemap, Google can:
- Discover your pages faster
- Index new content quickly
- Improve your site’s search visibility
Your Website ➡️ Sitemap ➡️ Google Search Console ➡️ Indexed in Google
Why Sitemaps Still Matter
Despite advances in crawling technology, search engines aren’t mind readers. A sitemap gives them the structure they need to index your site correctly—and quickly.
Let’s say you’ve launched a brand-new website. You’re proud of your content, but it’s not ranking. Why? Because without backlinks or strong internal links, Google may not even know those pages exist. A sitemap helps solve that by giving search engines a direct list of what to crawl.
Even on established sites, a sitemap becomes essential when your site structure is more complex—like if you have multiple categories, paginated archives, or hidden landing pages not linked from the homepage. Instead of leaving it up to chance, you’re giving Google a clear signal: “Here’s what matters. Index this.”
And it’s not just about initial discovery. When you update existing content or publish something new, your sitemap keeps search engines in the loop. That means faster visibility for time-sensitive updates, product launches, or seasonal campaigns—without waiting for crawlers to catch up.
In short, a sitemap is one of the simplest tools you can use to stay in control of how and when your content gets discovered. And that kind of visibility still matters—especially when speed and accuracy make the difference between ranking on page one or not at all.
Now, let’s go through the exact steps to submit your sitemap.
Step 1: Create a Sitemap
Most websites automatically generate a sitemap, but here’s how you can find or create one:
🔹 WordPress Users: Use an SEO plugin like Yoast SEO or Rank Math to generate a sitemap automatically.
🔹 Shopify, Wix, or Squarespace Users: These platforms automatically create a sitemap for you (usually found at yourwebsite.com/sitemap.xml).
🔹 Manually Create a Sitemap: If your website doesn’t generate one automatically, use a tool like XML-Sitemaps.com to create one.
Step 2: Find Your Sitemap URL
Most sitemaps are located at:
👉 yourwebsite.com/sitemap.xml
If you’re using Yoast SEO on WordPress, it may be at:
👉 yourwebsite.com/sitemap_index.xml
Open the link in your browser—if you see a structured list of URLs, your sitemap is working!
Step 3: Sign in to Google Search Console
Next, you need to tell Google about your sitemap.
1️⃣ Go to Google Search Console.
2️⃣ Log in with your Google account.
3️⃣ If you haven’t already added your website, click “Add Property” and follow the steps to verify ownership.
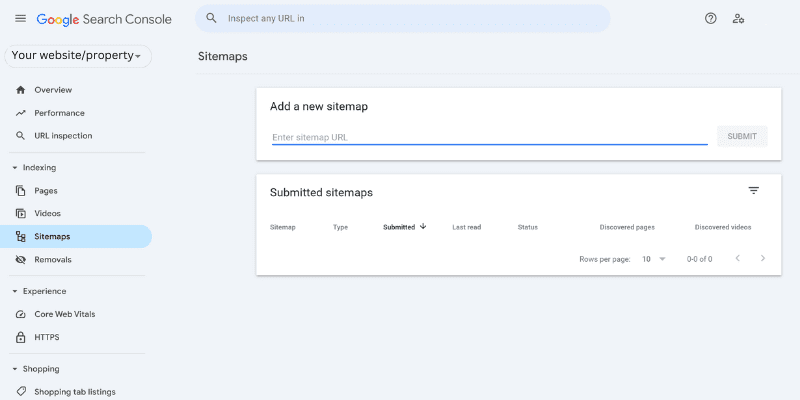
Step 4: Submit Your Sitemap
1️⃣ In the left-hand menu, click “Sitemaps.”
2️⃣ Under “Add a new sitemap,” enter your sitemap URL (e.g., sitemap.xml).
3️⃣ Click “Submit.”
That’s it! Google will now start crawling your site.
Step 5: Check Your Submission
Once you’ve submitted your sitemap, you can monitor its status:
-
- Go to Google Search Console > Sitemaps to see if it was successfully processed.
- If there are errors, fix them and resubmit your sitemap.
- Keep an eye on indexing reports to track how Google is crawling your site.
Get Indexed Faster!
Submitting your sitemap is one of the easiest ways to speed up Google indexing and make sure your content is discoverable. If you’re launching a new website or updating your content, don’t skip this step!
Pro Tip: Keep your site updated with fresh content and high-quality backlinks to encourage Google to crawl it more often.
If you manually create a sitemap, you will need these instructions to upload the file.
How to Upload Your Sitemap to the Root Folder of Your Website
Uploading your sitemap to your website’s root folder ensures that search engines like Google can find it easily. Here’s a step-by-step guide:
Step 1: Generate Your Sitemap
Manually Create One: Use XML-Sitemaps.com to generate a sitemap file.
Step 2: Download the Sitemap File
If you generated your sitemap manually, download the sitemap.xml file to your computer.
Step 3: Access Your Website’s Root Folder
The root folder is where your website files are stored. You can access it in one of these ways:
Option 1: Using cPanel (for most web hosts)
1️⃣ Log into your web hosting cPanel (e.g., Bluehost, A2, Big Scoots).
2️⃣ Find File Manager and open it.
3️⃣ Navigate to the public_html folder (this is your root directory).
Option 2: Using FTP (File Transfer Protocol)
1️⃣ Download and install an FTP client like FileZilla.
2️⃣ Connect to your website using your FTP credentials (provided by your web host).
3️⃣ Locate the public_html folder (this is your root directory).
Step 4: Upload Your Sitemap File
-
- In your cPanel’s File Manager or your FTP client, go to public_html.
- Click Upload and select your sitemap.xml file.
- Confirm that the file appears in the root directory.
Step 5: Verify Your Sitemap URL
After uploading, check if your sitemap is accessible by visiting:
👉 yourwebsite.com/sitemap.xml
If it loads properly, your sitemap is now live!
Step 6: Submit to Google Search Console (Optional but Recommended)
-
- Log into Google Search Console.
- Select your website.
- Go to Sitemaps and enter
sitemap.xmlin the submission box. - Click Submit to notify Google.
Uploading your sitemap to your root folder makes it easier for search engines to find and index your pages. If you’re using a platform like Wix or Shopify, this step may not be necessary since they generate and submit sitemaps automatically.
Want a pdf copy of these instructions? Fill in the form below to receive the checklist in your inbox.